
Para World Root
You have stumbled across the most basic part of creating a world. You can only upload the world for everyone to play once you have added these components.
Below is the diagram for the components, divided into four parts: Spawn point, custom camera, player's basic parameter, and uploading the world.
What exactly do they mean? Bare with your questions, and let's keep going.
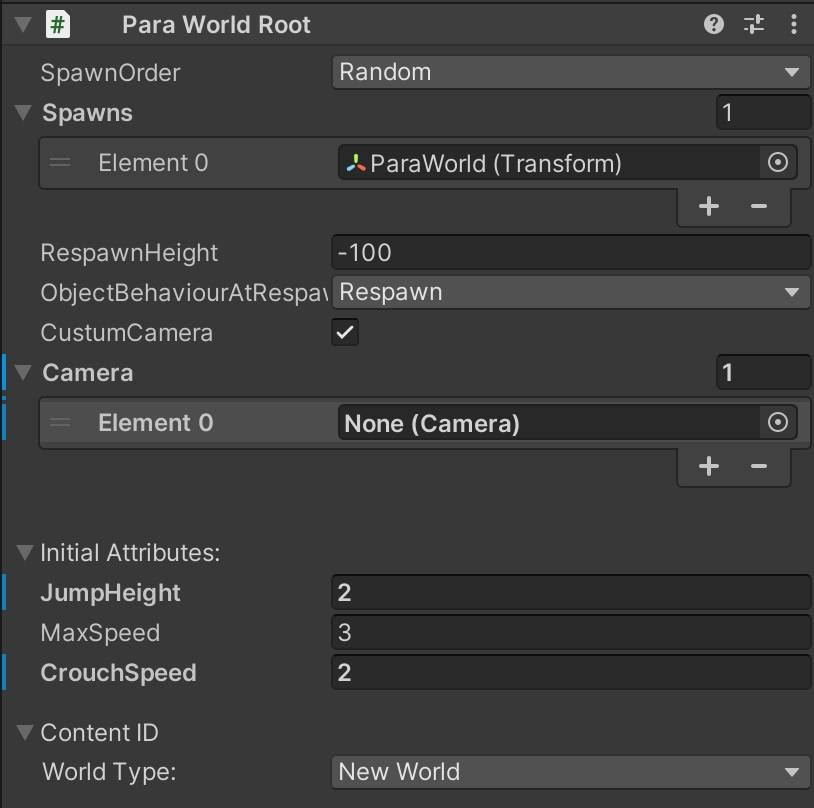
ParaWorldRoot:
This component must be added to the world before you can upload it
Spawn Point
The Spawn Point is the location where you are generated in the world. You will always spawn at the same location whenever you enter the world or fall down. This is your safe zone.
| Component Property Name | Property Description |
|---|---|
| Spawn Order | You may also configure the sequence of how these spawn points are used based on the characteristics of the world you created, placing them at any location you like. (Tips: Make sure you place them on a flat surface that can be stood upon!)
|
| Spawn Location | Creators can set up a list of options for the transforms as the locations of the spawn points. You can place them in different locations so that players can always feel something different every time they enter the world. |
| Respawn Height | Sets the respawn height in meters. Players and objects lower than this threshold will be respawned at the spawn point. Keep this in mind: you and all objects you drop are going to respawn at their original location. |
| Object Behavior below Respawn Height | You can set the logic behind the respawning of a player or an object (feel free to switch it up based on your world's gameplay!)
|
Custom camera
| Component Property Names | Property Description |
|---|---|
| Custom Camera | Custom Camera function. You can add custom cameras when it's enabled, and it allows creators to switch cameras using code in runtime. |
If there are no cameras in the world, the official camera will be added automatically once the world is uploaded, and it complies with the official 3C rules (Character, Controls, Camera).
Of course, you can set your preferred 3C rules using the custom cameras, such as over-the-shoulder views and side-scrolling games.
Drag the camera you created into the Custom Camera List to configure it as a Custom Camera. Cameras that are not associated here will be classified as added by mistakes and will be deleted once the world is uploaded. (Because default cameras were generated when the scene was created.)
Use ParaUtility:SetMainCamera API to set a particular camera as the main camera. Shown below:
---@var WorldCamera:UnityEngine.Camera
---@end

function ChangeCamera()
  ParaUtility:SetMainCamera(WorldCamera);
end
Set multiple camerasThe Custom Camera List allows multiple camera setups, enabling the advanced creators to create gameplay requiring more than one camera (split screen competitive gameplay, etc.).
Note: You need to carefully plan the Enable and Disable rules of the cameras, as well as the split screens. Avoid activating multiple cameras within the same screen since the player can only see one at a time!
More Readings: Unity Camera Functions
Sets the player's basic parameter:
These parameters are the underlying factors of your moving speed and jumping height within the world. It all depends on you and what kind of world you want to live in. Is it going to be a world where you are able to fly, a world where you run lightning fast, or just an ordinary world for everyday people? It's your call.
| Component Property Names | Property Description |
|---|---|
| Jump Height | The maximum height a player can reach by jumping |
| MaxSpeed | The maximum movement speed a player can achieve by moving |
| Crouch Speed | The maximum movement speed a player can achieve while crouching |
World Related:
The world is set to New World type by default the first time you upload it. It will be switched to Uploaded World type automatically once you've successfully uploaded it, and a Content ID is generated at that point. You can refer to this whenever you want to know the ID of the current world. In the future, if you ever want to upload another world, you can choose to upload a new one or the previously uploaded one as you see fit.
| Component Property Name | Property Description |
|---|---|
| World Type | Pick a World Type when uploading the world
|
| Content ID | Fill in the World's ID you want to replace and publish it to replace the old scene. |
Updated about 1 year ago