
Upload and Replace Avatar
This section describes how to configure your avatar and upload it to the platform.
We assume that you have installed Unity and have your avatar file.To upload your avatar, a proper version of Unity and SDK must be available, and you also need to prepare your own avatar file.
In this section, we use the official avatar—Maya, as an example.This section provides instructions in ideal conditions. During actual operations, unexpected errors may occur due to platform restrictions or engine problems.
Create Unity Project
Para Space uses the 3D Universal Render Pipeline (URP) in Unity.
- Open the Unity Hub.
- Click "New Project" in the upper right corner.
- Create a 3D URP project, with the project name and location determined by you.
It takes about 3 minutes to create a project, depending on your configuration.
Import SDK and Avatar to Unity
After creating a Unity project, import the SDK and avatar file to the project.
Generally, we recommend you import the SDK first.
If you are instructed to import other components, such as Dynamic Bone, please import them before importing the avatar file.
The avatar file is always the last one to be imported into a Unity project.
Configure Your Avatar
Find your avatar file on the "Project" page of Unity, and drag it into the scene.
Click the avatar in the scene (you are advised to click the parent node in "Hierarchy"), and then add the Avatar Root component to your avatar in the Inspector on the right.
After you add the Avatar Root component, a series of default properties will be automatically configured.
For details about Avatar Root, refer to Para Avatar Root.
Check Basic Configuration
Even though the default property configuration in the SDK provides basic avatar effects, you are advised to check whether some important properties have been properly configured to meet your needs.
Point of View
The point of view determines the camera location when you use the avatar.
Generally, the point of view should be located between the eyes of your avatar, on the same line as them.
The point of view can be adjusted as needed.
- After you add the Avatar Root component, the point of view will be automatically calculated.
- To adjust the point of view, click "Show" to directly relocate it in the scene.
- You can also precisely relocate the point of view by entering parameter values.
Whether Content ID is in New Avatar mode
If this is your first time uploading your avatar, manually check whether the Content ID is in New Avatar mode.
If the Content ID is not in New Avatar mode, it means that this avatar has been uploaded by another user, which will cause an upload failure due to a conflict.

Prepare for Upload
After checking your avatar configuration, click "Avatar Publish" to upload your avatar.

Account login is required if this is your first time clicking this button. If no account is available, please register on the platform.
After account login, click this button, and then you will be instructed to upload your avatar.
Resource Check
Firstly, you will enter a page for resource check and rating. Since Para Space is a mobile platform, we need ensure the performance of your mobile phone.
If any error message is displayed, you need to read the information and try to correct your avatar to meet resource requirements.
For details about resource warnings and errors, refer to the Avatar Asset Specification section.
If no error message is displayed, you can click "Upload" to enter the page for specifying upload information.
Configure Upload Property
The upload page lists a series of external description properties of your avatar.
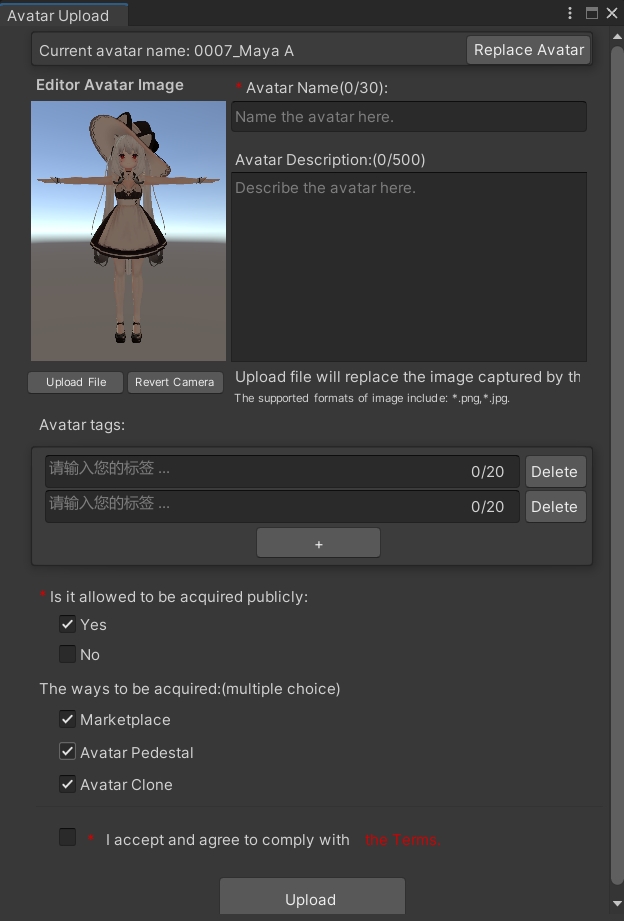
The properties are described as follows:
| Property Name | Description | Limitations |
|---|---|---|
| Editor Avatar Image | Used to determine the cover of your avatar in the platform. You can capture a cover by using the Unity camera or upload a local image. |
|
| Avatar Name | Indicates the name of your avatar. |
|
| Avatar Description | Indicates the descriptions of your avatar. |
|
| Avatar Tags | Indicates the tags of your avatar. |
|
| Is it Allowed to be acquired publicly | Indicates whether to make your avatar public. If you set your avatar as public, more detailed configurations are required. If you set your avatar as private, only you can use it. | |
| The ways to be acquired | Configures the ways to make your avatar public.
|
|
| I accept and agree to comply with.... | You need to accept our agreement before uploading your avatar. | Agreement is required for upload. |
After entering the information and accepting our agreement, you can click the upload button below to upload your avatar.
When the upload is completed, an upload success message will be displayed.
Then, the avatar uploaded will go into the cloud build process. You can view the progress on the resource management page.
Once the build process is executed successfully, you can find your avatar in the "My Upload" list on the platform.
ID is really important to your content!In ParaSpace, every content ID is unique and it won't be repeated even after deleting it.
If someone else knows your ID, you don't have to worry about your assets being overridden by others, but they can create teleportating portals and clone your public avatar without your authorization to access your world.
Please only send the ID to those who are authorized to use it by you!
When uploading a model, if the Content ID is in New Avatar mode, it means that the model will be uploaded as a new asset and will be assigned a new random ID number, which will be saved in the project. Afterwards, the Content ID will be modified to Existed Avatar mode, and each upload will overwrite the previous asset. You only need to reload it in the platform, and you don't need to appear with a new avatar each time.
Replace your avatar
Based on the upload rules that identify unique IDs, you can also replace an asset you uploaded with a completely different project.
You can enter the specified ID in the content ID section in another project, and then upload it. The image pointed to by this ID will be replaced by the image in your current project.
You don't have to worry about others overwriting your image.
When a user uploads in Existed Avatar mode, we check if the ID belongs to this user. Only the owner of the account associated with the ID has the right to replace the asset content. If we find that the ID does not belong to the currently logged-in account, we will forcibly switch to New Avatar mode.
Even if someone obtains your asset Content ID, they cannot replace your asset.
Updated about 1 year ago