Official Avatar Shader
Generally, there are three categories of avatar shaders: cartoon shader, PBR shader, VFX shader.
Note: Only shaders in the "ParaSpace/Avatar" path can be used on ParaSpace avatars.
Cartoon shader
Currently, cartoon shader libraries include:
Path:ParaSpace/Avatar/Cartoon
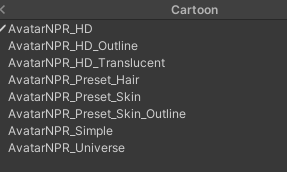
AvatarNPR_HD:This shader provides all the cartoon effects available, but using it incurs large cost.
AvatarNPR_HD_Outline:Full-effect shader that supports the outline effect
AvatarNPR_HD_Translucent: Translucent version of full-effect shader
AvatarNPR_Preset_Hair:This shader is used for hairs, with special highlighting effects added.
AvatarNPR_Preset_Skin:This is a skin shader with good performance. It is pre-configured with parameters and Ramp maps suitable for skin effects.
AvatarNPR_Preset_Skin_Outline:A version of the skin shader that supports the outline effect.
AvatarNPR_Simple:This shader provides the best performance. It retains the basic maps and removes other additional effects.
AvatarNPR_Universe:This shader provides good performance. It removes additional effects such as multiple highlights, but still retains key features with high usage rate.
AvatarNPR_HD
Panel overview:

Cull mode:

This option is used to set the clipping mode of the polygons.The default value is Back, which is to cut the back of an object when rendering. Set it to Off for objects whose two faces need to be visible.
Tips: Attention! Once this option is set to Off, the number of faces to be rendered will be doubled, which significantly decreases the performance. We recommend that you use this option carefully to ensure a better gaming experience. If a few parts of the body need double-side effect, you are suggested to replicate the polygons and flip normals for required parts of the model in other 3D software. This can minimize the number of extra polygons that need to be rendered to a large extent.
Basic map settings:

This group of settings is used to configure the basic color map and correct the color.
Normalmap settings:

This group of settings is used to enable/disable the normal map and configure the map.
Ramp map settings::

This group of settings is used to configure the ramp map and correct the color.
RampTex: Configures the ramp map.
RampColor: Corrects the color of the ramp map.
RampRage: Controls the position of the ramp map mapped to the surface of the object.
Tips: Ramp maps can be used to simulate the color changes of an object from its bright side to its dark side. For example, you can draw a map that has slightly more saturated colors at the bright-dark boundary to express the sense of translucence.
Dark part settings:

This group of settings is used to set the parameters of the dark part.
DarkColor: Sets the color of the dark part.
DarkRage: Sets the position of the bright/dark boundary.
DarkSoft: Sets the softening degree of the bright/dark boundary.
Shadow mask setting:

This group of settings is used to configure the position of the shadowmask map.
UseShadowMask: Enables/Disables ShadowMask feature.
ShadowMask: Sets the position of the shadowmask map.
ShadowMaskPower: Increases/Decreases shadow map strength.
Matcap setting:

This group of settings is about Matcap.
UseMatcap: Enables/Disables MatCap.
MatcapTex: Configures the position of the MatCap map.
MatcapColor: Corrects the color of the map.
MatcapPower: Enhances the map effect.
MatcapBlend: Sets the coverage level of the MatCap map.
Tips: MatCap maps are used to simulate various special textures, such as, highly reflective metal and rich hair reflection.
Emission map settings:
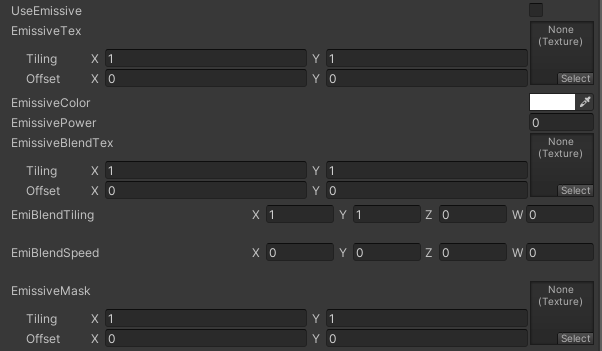
This group of settings is used to configure the self-illumination effect.
UseEmissive: Enables/Disables the self-illumination effect.
EmissiveTex: Configures the emission map.
EmissiveColor: Corrects the self-illumination colors.
EmissivePower: Enhances the strength of the self-illumination effect.
EmissiveBlendTex: Applies blend maps with special effects (such as noise maps).
EmiBlednTilling: Sets the number of tilings for the blend maps with special effects.
EmiBlendSpeed: Controls the moving direction and speed of special effect in U and V directions (X = U, Y = V, positive or negative).
EmissiveMask: Controls the area where blend maps with special effects overlay.
Highlight settings:
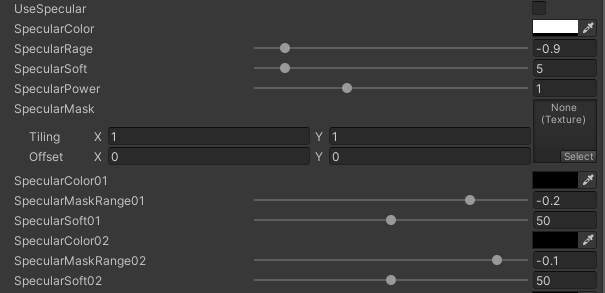
This group of settings is used to configure the highlight effect.
UseSpecular: Enables/Disables highlighting.
SpecularColor: Sets the highlight color.
SpecularRange: Sets the highlight range.
SpecularSoft: Sets the softening degree of the highlight.
SpecularPower: Sets the strength of the highlight.
SpecularMask: Sets the mask in the highlighted area.
SpecularColor01: Sets the color of the additional highlight layer 01.
SpecularMaskRange01: Sets the range of the additional highlight layer 01 (effective in the mask area).
SpecularSoft01: Sets the softening degree of the additional highlight layer 01.
SpecularColor02: Sets the color of the additional highlight layer 02.
SpecularMaskRange02: Sets the range of the additional highlight layer 02.
SpecularSoft02: Sets the softening degree of the additional highlight layer 02.
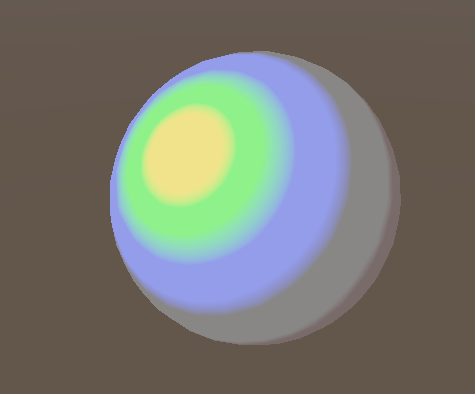
Tips: Each layer of additional highlights must be within the range of the previous layer. You should set the range of the first layer of highlights large enough to make the next two layers visible.
Reference image:
Rim light settings:

This group of settings is used to set the rim light effect.
RimLightColor: Sets the rim light color.
RimLightRange: Sets the rim light range.
RimLightSoft: Sets the softening degree of the rim light.
RimOffset: Sets the offset of the rim light, for example, to simulate a backlight effect on one side.
RimMask: Configures the rim light mask map. (You can mask out the unwanted parts, such as the neck, armpits, inner thighs, etc.)
AvatarNPR_HD_Translucent
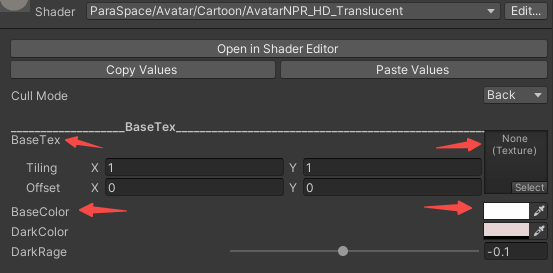
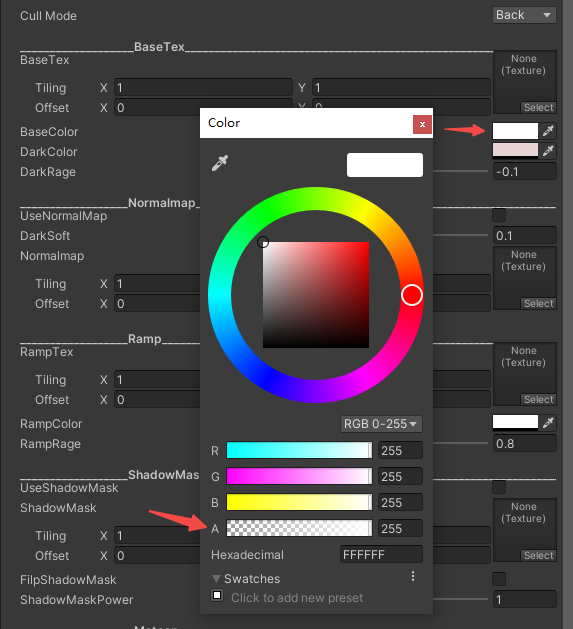
This shader retains all the effects of AvatarNPR_HD. The only difference is that the Alpha channel of the BaseTex map is called as a translucent control map. Black is transparent, white is opaque, and translucency is allowed. Besides, the Alpha value of BaseColor is applied to affect the translucence level. If you want full transparency, or you want to correct the translucence level of the channel, you can use this control parameter. (See the image below)
AvatarNPR_HD_OutLine
This shader is a full-effect shader with the outline effect, which is suitable for users who really need it. However, note that the outline effect may double the number of mesh faces. Therefore, to ensure a better gaming experience for you and your friends, use this effect carefully.
AvatarNPR_Preset_Hair
This hair shader is specifically used for simulating the highlighting effect of hair anisotropy, eliminating various complex processes of conventional hairdressing. In addition, relevant parameters are pre-configured to make the shader more convenient to use.
Tips: Hair-related pre-configured MatCaps are available on the official website, from which users can download as needed.
Anisotropy highlighting:

HighlightMask: Sets the mask in the highlighted area.
HighlightColor: Sets the highlight color.
HighlightPower: Sets the strength of the highlight.
HighlightOffset: Sets the offset from the highlighted area.
HighlightWidth: Sets the width of the highlighted area.
AvatarNPR_Universe
This shader is strongly recommended, as it has retained most frequently-used effects and been relatively excellent in performance.
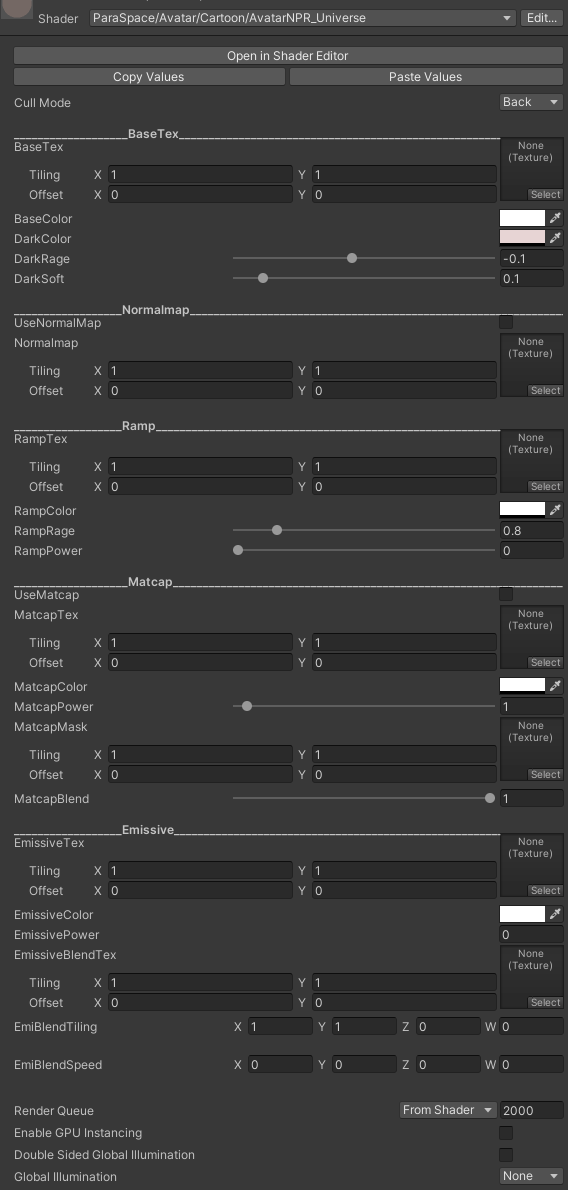
Cull mode:

This option is used to set the clipping mode of the polygons.The default value is Back, which is to cut the back of an object when rendering. Set it to Off for objects whose two faces need to be visible.
Tips: Attention! Once this option is set to Off, the number of faces to be rendered will be doubled, which significantly decreases the performance. We recommend that you use this option carefully to ensure a better gaming experience. If a few parts of the body need double-side effect, you are suggested to replicate the polygons and flip normals for required parts of the model in other 3D software. This can minimize the number of extra polygons that need to be rendered to a large extent.
Basic map settings:

This group of settings is used to configure the basic color map and correct the color.
Normalmap setting:

This group of settings is used to enable/disable the normal map and configure the map.
Ramp setting:

This group of settings is used to configure the ramp map and correct the color.
RampTex: Configures the ramp map.
RampColor: Corrects the color of the ramp map.
RampRage: Controls the position of the ramp map mapped to the surface of the object.
RampPower: Sets the strength of the ramp map.
Tips: Ramp maps can be used to simulate the color changes of an object from its bright side to its dark side. For example, you can draw a map that has slightly more saturated colors at the bright-dark boundary to express the sense of translucence.
Dark part settings:

This group of settings is used to set the parameters of the dark part.
DarkColor: Sets the color of the dark part.
DarkRage: Sets the position of the bright/dark boundary.
DarkSoft: Sets the softening degree of the bright/dark boundary.
MatCap map settings:

This group of settings is about Matcap.
UseMatcap: Enables/Disables Matcap.
MatcapTex: Configures the position of the MatCap map.
MatcapColor: Corrects the color of the map.
MatcapPower: Enhances the map effect.
MatcapBlend: Sets the coverage level of the MatCap map.
Tips: MatCap maps are used to simulate various special textures, such as, highly reflective metal and rich hair reflection.
Emission map settings:
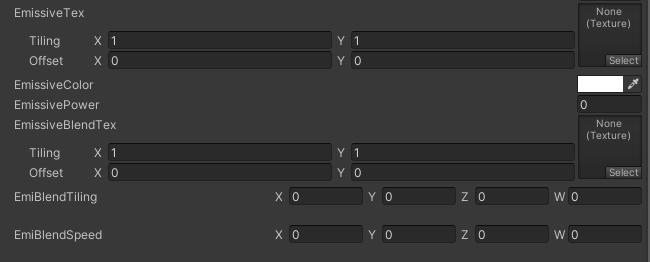
This group of settings is used to configure the self-illumination effect.
EmissiveTex: Configures the emission map.
EmissiveColor: Corrects the self-illumination colors.
EmissivePower: Enhances the strength of the self-illumination effect.
EmissiveBlendTex: Applies blend maps with special effects (such as noise maps).
EmiBlednTilling: Sets the number of tilings for the blend maps with special effects.
EmiBlendSpeed: Controls the moving direction and speed of special effect in U and V directions (X = U, Y = V, positive or negative).
AvatarNPR_Simple
This shader can achieve the best performance. It has the main map, color correction, and settings of dark parts, which is suitable for components that mainly depend on the map colors, such as eyes.
AvatarNPR_Preset_Skin
This shader is specially designed for skins. It has the ramp map that can simulate the simple 3S effect of skins and preconfigured colors for dark parts, featuring easy configuration and excellent performance.
AvatarNPR_Preset_Skin_OutLine
This shader is an outline shader for skins. As the outline effect doubles the number of faces, the performance is undesirable. Please use it carefully.
PBR Shader
This shader is suitable for the modeling of realistic avatars.
Current PBR shader library:
Path:ParaSpace/Avatar/PBR
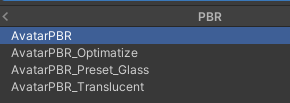
AvatarPBR:This shader is similar to Unity URP Lit shader. The difference is that it has a position where you can paste the ramp map.
AvatarPBR_Optimatize:It is a shader formed by synthesizing PBR channels. It requires few maps and achieves better performance when the PBR effect is unchanged. We strongly recommend that you use this shader.
AvatarPBR_Preset_Glass:This shader is for generally-purposed glass, which is used to make fully transparent materials and easy to configure. It is generally used for eyeglasses, transparent face mask, etc.
AvatarPBR_Translucent:This shader is applicable to most translucent effects,You can configure the metallicity roughness and translucence using maps. This shader is suitable for various kinds of fine translucent glass materials with decorative patterns.
AvatarPBR
Panel overview::
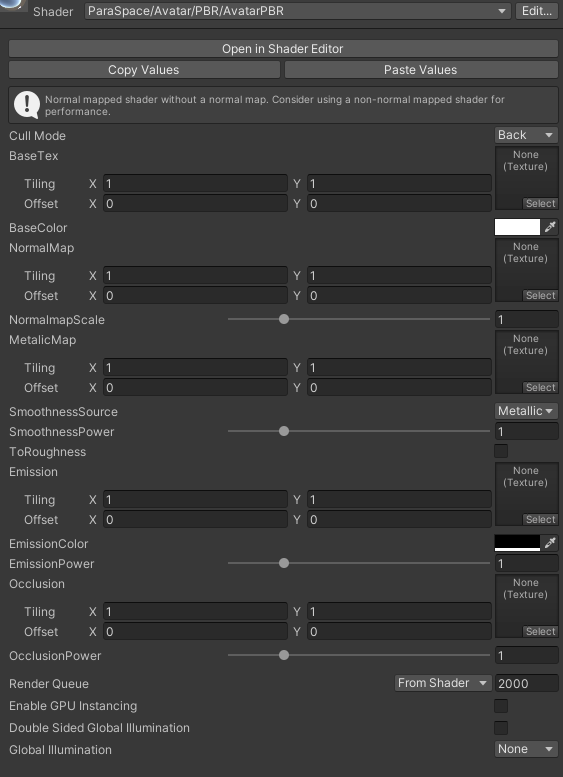
Set the basic color map:

BaseTex: Configures the basic color map.
BaseColor: Corrects the color of the map.
Set the Normalmap:

Normalmap: Configures the normal map.
NormalmapScale: Adjusts the normal map strength.
Set the metallicity and smoothness:

MetallicMap: Configures the metallicity map.
SmoothnessSource: Set the source of the smoothness map (Alpha or Base TexAlpha).
SmoothnessPower: Sets the smoothness level.
ToRoughness: Convert a smoothness map into a roughness map.
Configure the emission map:

Emission: Configures the emission map.
EmissionColor: Sets the self-illumination color.
EmissionPower: Sets the strength of the self-illumination effect.
Configure the occlusion map:

Occlusion: Configures the occlusion map.
OcclusionPower: Sets the occlusion strength.
Tips: Occlusion maps are used to control the impact of cubemap. Therefore, if an occlusion map is too dark, it will indirectly affect the brightness of the model.
AvatarPBR_Optimatize
Panel overview:
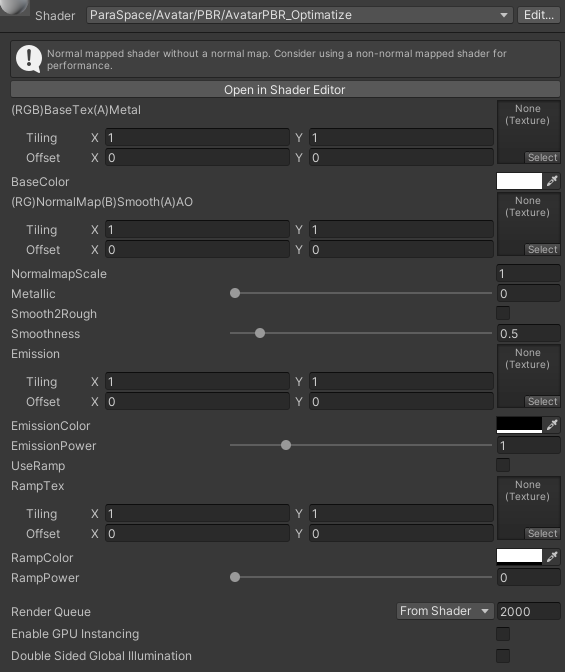
Basic color map and metallicity map:

(RGB) BaseTex (A) Metal: RGB channel for the color map and Alpha channel for the metallicity map.
BaseColor: Corrects the map colors.
Set NormalMap, smoothness, and AO map:

(RG) NormalMap (B) Smoothness (A) AO: RG channel for Normalmap, B channel for the smoothness map, and Alpha channel for the AO map.
NormalmapScale: Adjusts the normal map strength.
MetallicPower: Sets the metallicity.
Smooth2Rough: Converts a smoothness map into a roughness map.
SmoothnessPower: Sets the smoothness level.
Set the emission map:

Emission: Configures the emission map.
EmissionColor: Sets the self-illumination colors.
EmissionPower: Sets the strength of the self-illumination effect.
Set the ramp map:

UseRamp: Enables/disables the ramp map.
RampTex: Sets the ramp map.
RampColor: Corrects the color of the ramp map.
RampPower: Sets the ramp strength.
AvatarPBR_Preset_Glass
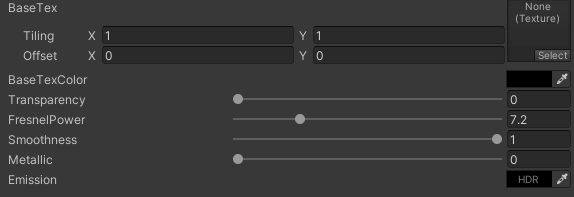
BaseTex: Configures the basic color map.。
BaseTexColor:Corrects the basic map color.
Transparency:Sets the overall translucence.
FresnelPower:Sets the Fresnel.
Smoothness:Sets the smoothness.
Metallic:Sets the metallicity.
Emission:Sets the self-illumination colors and luminance.
AvatarPBR_Translucent
Panel overview:
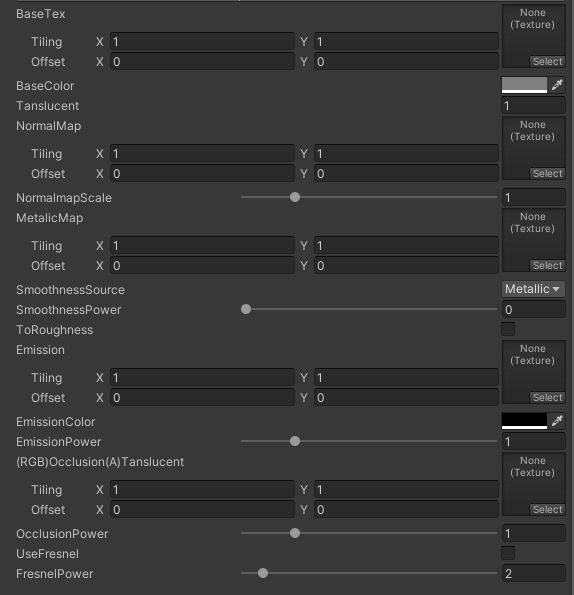
For the use of this shader, please refer to AvatarPBR,added translucent information sampling to the alpha channel of Occlusion map。
VFX Shader
Current VFX effect shader library:
(There are so many special effect shaders and it's hard for us to cover everything at the beginning, but we will continue to expand our shader library according to user needs in the future.)
Path:ParaSpace/Avatar/Effect

AvatarVFX
Panel overview:

Mode setting:

Cull Mode:Cull mode (tips: usually select Back to crop out the back, and select Off mode if double-sided display is required.)
Blend_Mode:Blend is the overlay blend mode, and Add is the increase brightness blend mode.
Depth_Fade:This function is used to solve the visual effect of edge when the object interpenetrating other things such as the ground.
Base map setting:
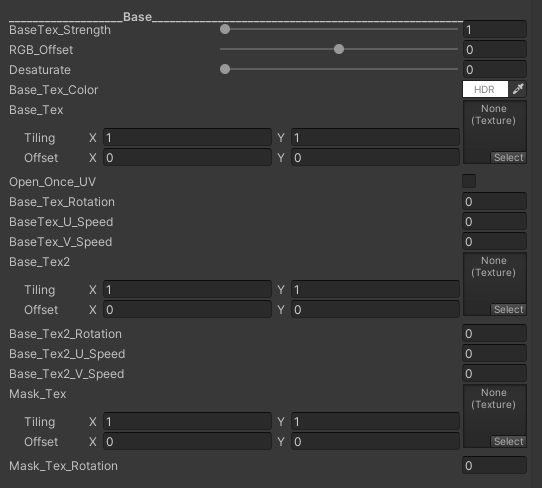
BaseTex_Strength:Base map intensity, which can increase the map brightness by up to 5 times.
RGB_Offset:Controls the map dispersion effect and offsets the channel.
Desaturate:Decrease the saturation level.
Base_Tex_Color:Fix the map color.
Base_Tex:Set the base map.
Open_Once_UV:Turns on the UV clamp .
Base_Tex_Rotation:Base map rotation.
Base_Tex_U_Speed:Set U offset animation speed.
Base_Tex_V_Speed:Set V offset animation speed.
Mask_Tex:Set the mask texture.
Mask_Tex_Rotation:Texture rotation.
Disturbance setting:
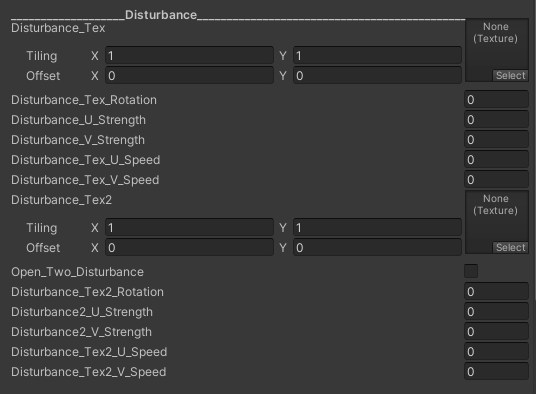
Disturbance_Tex:Set the disturbance map。
Disturbance_Tex_Rotation:Texture rotation.
Disturbance_U_Strength:Disturbance intensity in U direction.
Disturbance_V_Strength:Disturbance intensity in v direction.
Disturbance_Tex_U_Speed:The disturbance map U offset speed.
Disturbance_Tex_V_Speed:The disturbance map v offset speed.
Disturbance_Tex2:Blend the disturbance map 2.
Open_Two_Disturbance:Use the disturbance map 2.
Disturbance_Tex2_Rotation:Rotate the disturbance map 2.
Disturbance2_U_Strength:The map2 disturbance intensity in U direction.
Disturbance2_V_Strength:The map2 disturbance intensity in v direction.
Disturbance_Tex2_U_Speed:The disturbance map2 U offset speed.
Disturbance_Tex2_V_Speed:The disturbance map2 V offset speed.
Color mapping setting:
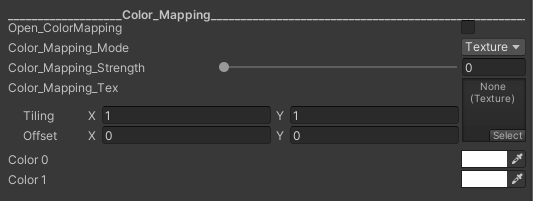
Open_ColorMapping: Turn on the color blending function.
Color_Mapping_Mode: Set color or map mode.
Color_Mapping_Strength: Set the color blend intensity.
Color_Mapping_Tex: Set the color texture.
Color 0: Set the color 0. (Effective after the color mode is turned on)
Color 1: Set the color 1. (Effective after the color mode is turned on)
Dissolve setting:
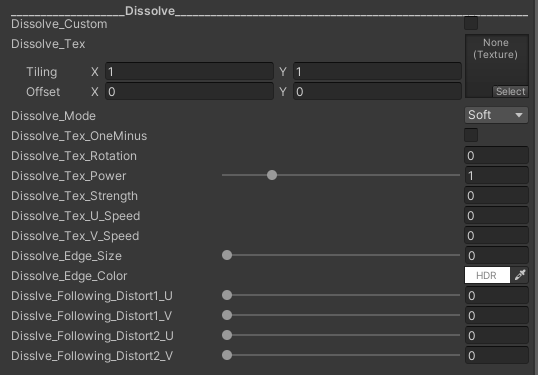
Dissolve_Custom: Enable dissolution customization.
Dissolve_Tex: Set the dissolve texture.
Dissolve_Mode: Dissolve edge effect mode.
Dissolve_Tex_OneMinus: The dissolve map inversion.
Dissolve_Tex_Rotation: The dissolve map rotation.
Dissolve_Tex_Strength: Dissolve map changes. (tips: 0 means no dissolution effect, and 1 means complete dissolution and disappearance.)
Dissolve_Tex_U_Speed: Dissolve map U offset speed.
Dissolve_Tex_V_Speed: Dissolve map V offset speed.
Dissolve_Edge_Size: The size of the dissolved edge is effective when the hard edge is opened.
Dissolve_Edge_Color: Dissolve the edge color.
Dissolve_Following_Distort1_U: Dissolve U disturbance 1, which is associated with Disturbance_U_Strength corresponding settings.
Dissolve_Following_Distort1_V: Dissolve V disturbance 1, which is associated with Disturbance_V_Strength corresponding settings.
Dissolve_Following_Distort2_U: Dissolve U disturbance 2, which is associated with Disturbance_U_Strength corresponding settings.
Dissolve_Following_Distort2_V: Dissolve V disturbance 2, which is associated with Disturbance_U_Strength corresponding settings.
Fresnel setting:
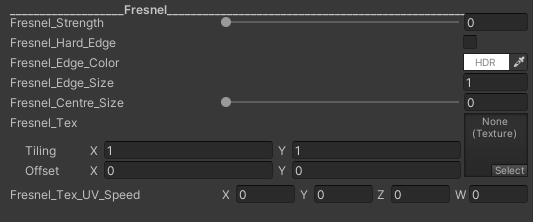
Fresnel_Strength:Set fresnel strength。
Frensnel_Hard_Edge:Turn on Fresnel hard edge effect。
Frensnel_Edge_Color:Set color of Fresnel edge.
Frensnel_Edge_Size:Set size of Fresnel edge.
Frensnel_Centre_Size:Fresnel center scaling。
Frensnel_Tex:Fresnel mask map。
Frensnel_Tex_UV_Speed:Fresnel mask map UV offset animation。
Model setting:

Open_Model_Softedge:Open the model edge fade out.
Model_Softedge_Strength:The model edge fade out intensity。
Vertex offset setting:
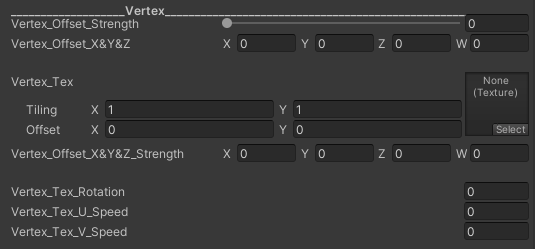
Vertex_Offset_Strength:Global strength control of vertex displacement。
Vertex_Offset_X&Y&Z:Offset the vertex position in XYZ direction。
Vertex_Tex:Set the mask texture.
Vertex_Offset_X&Y&Z_Strength:Overall offset of vertex displacement.
Vertex_Tex_Rotation:The mask texture rotation.
Vertex_Tex_U_Speed:The mask texture U offset animation.
Vertex_Tex_V_Speed:The mask texture V offset animation.
AvatarVFX_ParticlesUnilt
Panel overview:
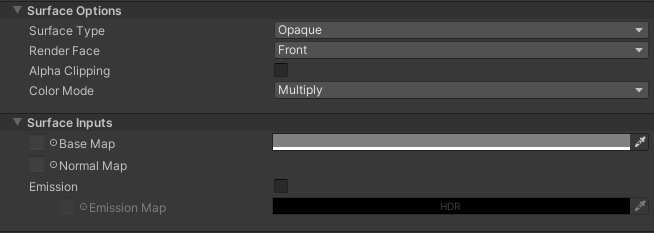
This shader is used in the same way as ParticlesUnIit of UnityURP, which is collected for filtering, calling, and subsequent optimization.
SurfaceType: Opaque refers to the opaque class and Transparent refers to the translucent class. Tips: Most of the special effects used are translucent.
RenderFace: Set the clipping face. Both refers to display both faces, Back refers to cut the front face, while Front refers to cut the back face. Tips: The default value is Front. The back of the model will not be rendered. Generally, this value is preferred for better performance.
Alpha Clipping: Sets the threshold for translucent clipping. Tips:This can control the size of the translucent area.
ColorMode: Mode in which the color of the rendering layer at the back of the current model is mixed.
BaseMap: Sets the position of the color map.
NormalMap: Sets the position of the normals map.
Emission: Enables/disables the self-illumination effect.
Emission Map: Sets the position of the emission map. The Color on the right can be used to correct the color and in HDR mode, you can correct more than 1 color.
AvatarVFX_Rotation
Panel overview:
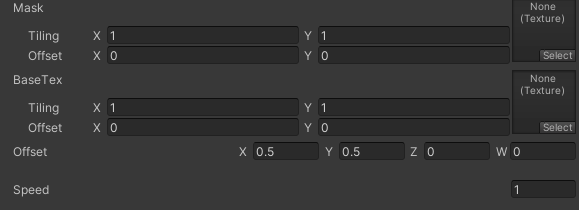
This shader is used to make simple rotation effects.
Mask:Set the mask texture.
BaseTex:Set the color texture.
Offset:Set rotation center offset.
Speed:Set speed.
Updated 11 months ago