
Configure and Use Expressions
This document assumes that you already know about Unity Animator Controller and layer settings.Expressions take effect based on the Animator Controller.
We try to explain how expressions are designed and work in simple language.
This is a topic that requires not only learning but understanding, and we have the following document here to serve this purpose.
You can click or to learn about Animator Controller and Animator Controller Group.
After customizing the Animator Controller, you need a set of functions to trigger it. Otherwise, animations created will not play after your avatar enters the platform when there is no way to trigger the parameter inside the Animator Controller.
For this reason, we provide Expressions, using which you can actively change the parameters of the Animator Controller in the platform.
Generally, Expressions are identification files where you can configure menu buttons to actively operate parameters of the Animator Controller for playing the animations configured.
Rules of Expressions
Expressions are used to dynamically change the parameters of the Animator Controller in the platform in real-time.
Each effect in the expression menu is identified as a button in the platform.
The name and icon of a button depending on the information configured in the expression menu.
After you press a button, the effect represented by the button will take effect accordingly. For example, you may set a certain parameter to 1 so that the Animator Controller starts to play the corresponding animation (depending on the preconfigured logic).
Using Expressions, you can play animations as you want by just changing the parameters of the Animator Controller in the platform. For example, dancing, enabling or disabling an object, or playing music.
Create Expression Menu
Create an expression menu in any directory to customize your expressions.
Actions: Create > Para Space > Avatar Expression
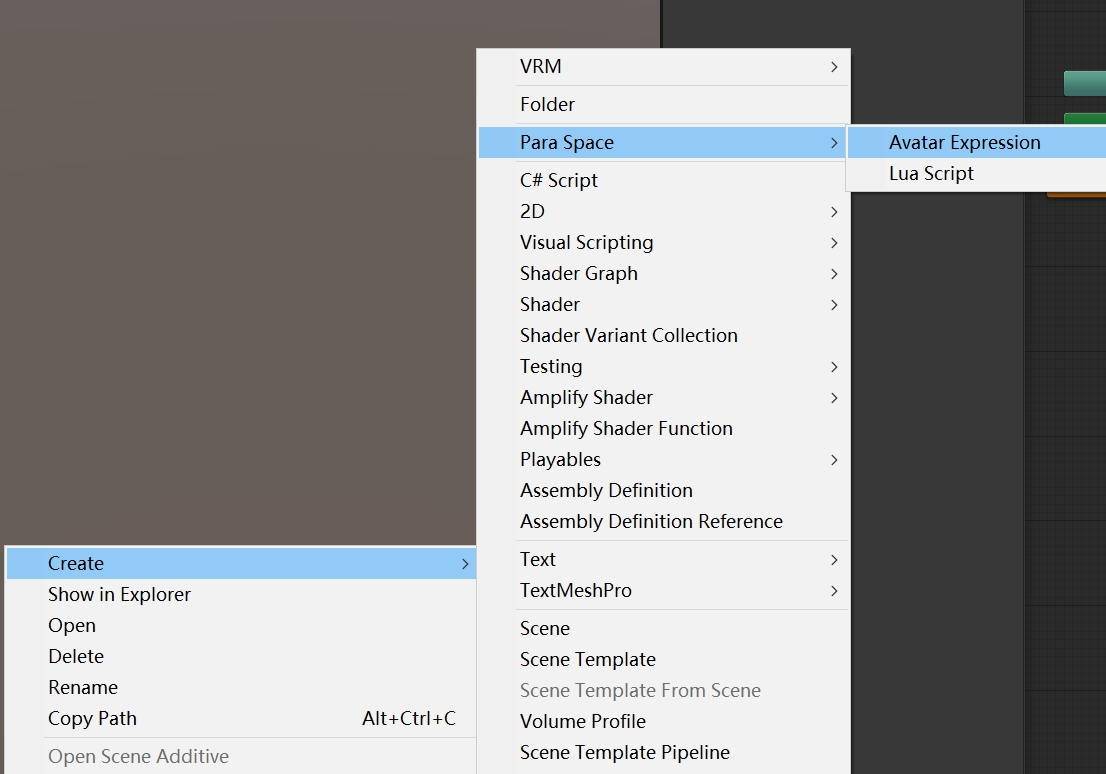
After creating an expression file named "AvatarExpression," you can then configure it in the Inspector.
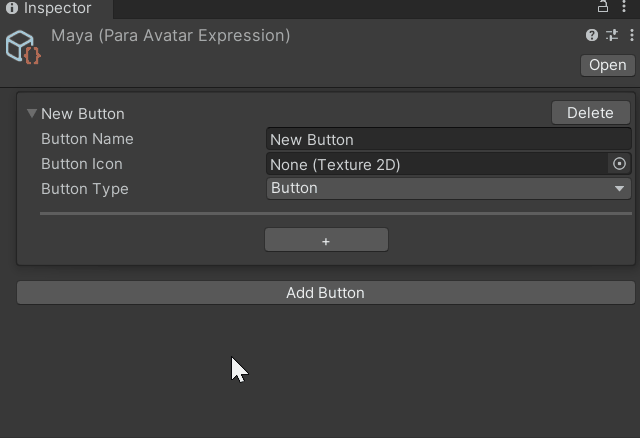
Expression Menu Basics
By default, an expression menu provides an unconfigured button.
6_194500.png "motion202https://files.readme.io/9db309b-motion2022-122-12-16 19
4500.png")
Its parameters are as follows:
| Name | Effect |
|---|---|
| Button Name | Indicates the name of a button. |
| Button Icon | Indicates the icon of a button. |
| Button Type | Indicates the type of a button, which determines the effect displayed after the button is pressed. |
You can customize the button name and icon.
- A name consists of up to 18 characters.
Button Type
We provide a total of 6 types of buttons to implement different effects after a button is pressed.
| Type | Effect |
|---|---|
| Button | Click button. \nAfter this type of button is pressed, the corresponding parameter value will be changed by 0.2s. \nIf this type of button is being long pressed, the parameter value will remain modified until the button is released, and then recover after 0.2s. |
| Toggle | Toggle button. \nAfter this type of button is pressed, the button remains pressed and the corresponding parameter value remains modified, until the button is clicked again. |
| Radial Puppet | Progress button. \nThis type of button takes effect only for Float parameters, and the corresponding parameter must be set to a value between 0 and 1. \nIt is generally used for creating animations with key frames. |
| Two Axis Puppet | Blend button. \nThis is a special type of button that can be used to operate two Float parameters and set their values separately at the same time. The corresponding parameter must be set to a value between -1, and 1. \nThis type of button is mostly used for creating animations using blend trees. |
| Number Stepper | Numeric stepper: \nThis type of button takes effect only for Int values. You can specify an integer range and then randomly change an Int value within this range by using this type of button. |
| Sub Menu | Button redirected to a new menu: \nThis type of button does not configure any Animator Controller parameter but can be used to carry another Expression menu file. In this way, users will be redirected to a new expression menu after clicking the button. |
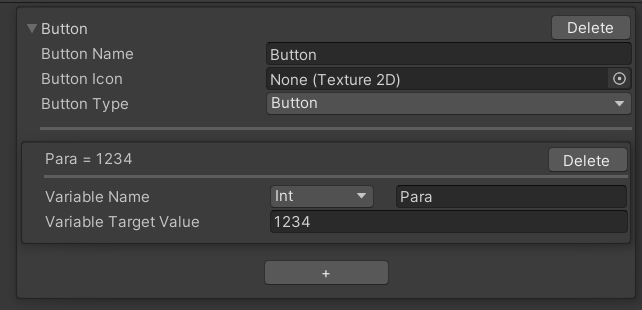
Button
This type of button is most commonly used. It can be used to validate or stop an animation effect immediately.
- Every time this type of button is clicked, the corresponding parameter value will be changed by 0.2s and then be reset.
- If this type of button is long pressed, the corresponding parameter value remains modified until the button is released and will then be reset after 0.2s.
Click the plus sign (+) to add a parameter group.
- A button of Button type can be used to operate multiple parameters at the same time.
- Parameters will be operated sequentially from top to down at an interval of 0.1s.
Each parameter group represents a parameter target to be changed by the button.
You need to specify the parameter type, enter the parameter name, and specify the value after the button is pressed.
| Variable Name | Indicates the type and name of a parameter, used to determine a parameter target and permitted value range. |
| Variable Target Value | Indicates the parameter value. After the button is pressed, the corresponding parameter will be set to this value. |
As shown in the following figure:
After the button named "Button" is pressed, "Para" in the Animator Controller will be set to "1234".
Toggle
Toggle is similar to a switch in our daily life, which is used to switch between two states without the user having to keep pressing it.
- The button remains pressed after being clicked. The corresponding parameter value remains modified until the button is clicked again.
- Click the button again to disable the button and reset the parameter value.
Click the plus sign (+) to add a parameter group.
- Similar to the Button type, toggle buttons can also be used to operate multiple parameters sequentially from top to down at an interval of 0.1s.
Radial Puppet
To understand this type of button, you'd better know about "Motion Time" of an Animator Controller node.Radial Puppet, highly dependent on "Motion Time",is used to control the "progress" instead of "play/stop" of animations.
You can also use Radial Puppet as a common button, with the Float parameter set to a value between 0 and 1. We have no restrictions on such usage:)
Radial Puppet is a button type only used in special cases.
It is a compound of Button and Toggle.
Radial Puppet has the following special rules:
- When a Radial Puppet button is pressed, you can configure an "extra parameter."
- When a Radial Puppet button is pressed, you can stop the animation at any point of progress from 0% to 100% (by using "Motion Time").
- After the Radial Puppet button is released, the "extra parameter" will be reset, while the animation playback progress will be retained.
- Radical Puppet can be used to operate only one parameter group with only one parameter target at a time, and the parameter must be of Float type.
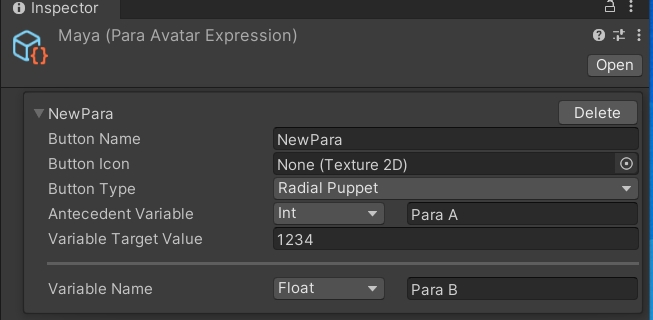
| Antecedent Variable | Indicates the type and name of an extra parameter, used to determine a parameter target and permitted value range. |
| Variable Target Value | Indicates the target value of an extra parameter. |
| Variable Name | Indicates the parameter name of Motion Time (or a Float parameter), used to determine a parameter target. |
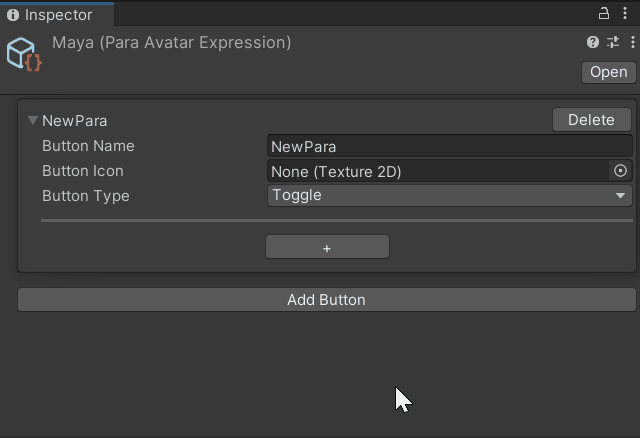
As shown in the figure above:
- A button named "NewPara" is available.
- When the button is pressed, "Para A" is set to "1234".
- You can set "Para B" to any value between 0 and 1. (With the "Motion Time" function, this value indicates the animation playback progress from 0% to 100%.)
- When the button is released, "Para A" is reset to the original value, while the value of "Para B" remains unchanged.
Two Axis Puppet
To understand this type of button, you'd better know about "Blend Tree" of the Animator Controller.Two Axis Puppet, highly dependent on "Blend Tree",is used to operate blend trees in the Animator Controller.
You can also use Two Axis Puppet as a common button, with two Float parameters configured separately. We have no restrictions on such usage.
Two Axis Puppet is a button type only used in special cases.
It is specially used for operating the X-axis and Y-axis parameters of "Blend Tree" in the Animator Controller. By using this type of button, the X-axis and Y-axis parameters of a blend tree can be precisely controlled, with visualized blending effects provided as well.
Two Axis Puppet has the following special rules:
- When a Two Axis Puppet button is pressed, you can configure an "extra parameter."
- When a Two Axis Puppet button is pressed, you can control two Float values at the same time, with each of them set to a value between -1 and 1.
- After the Two Axis Puppet button is released, the "extra parameter" will be reset, while the two Float values will be retained.
- Two Axis Puppet can be used to operate only one parameter group with two parameter targets at a time, and the parameter must be of Float type.
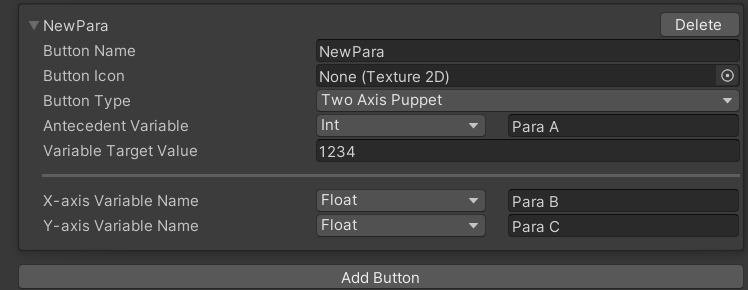
| Antecedent Variable | Indicates the type and name of an extra parameter, used to determine a parameter target and permitted value range. |
| Variable Target Value | Indicates the target value of an extra parameter. |
| X-axis Variable Name | Indicates the parameter name of the X-axis (or a Float parameter) in a blend tree, used to determine a parameter target. |
| Y-axis Variable Name | Indicates the parameter name of the Y-axis (or a Float parameter) in a blend tree, used to determine a parameter target. |
As shown in the figure above:
- A button named "NewPara" is available.
- When the button is pressed, "Para A" is set to "1234".
- You can set "Para B" and "Para C" to any value between -1 and 1.
- When the button is released, "Para A" is reset to the original value, while the values of "Para B" and "Para C" remain unchanged.
Number Stepper
Number Stepper is the upgraded version of Toggle.
It not only solves conflicts among multiple Toggle buttons in the case where the same Int parameter is set to multiple valid values but also makes it possible to get rid of multiple buttons.
Number Stepper has the following special designs:
- When a Number Stepper button is pressed, you can configure an "extra parameter."
- When a Number Stepper button is pressed, an Int value will be set, which can be configured to another value within the specified range.
- After the Number Stepper button is released, the "extra parameter" will be reset, while the target Int value will be retained.
- Number Stepper can be used to operate only one parameter group with only one parameter target at a time, and the parameter must be of Int type.

| Default Value | Indicates the default value of the target parameter. |
| Max Value | Indicates the minimum value permitted for the target parameter. |
| Min Value | Indicates the maximum value permitted for the target parameter. |
| Antecedent Variable | Indicates the type and name of an extra parameter, used to determine a parameter target and permitted value range. |
| Variable Target Value | Indicates the target value of an extra parameter. |
| Variable Name | Indicates the name of an Int parameter, used to determine a parameter target. |
As shown in the figure above:
- A button named "NewPara" is available.
- When the button is pressed, "Para A" is set to "1234", and "Para B" is set to "0".
- You can set "Para B" to any integer between 0 and 9 by using the stepper.
- When the button is released, "Para A" is reset, while the value of "Para B" remains unchanged.
Sub Menu
This type of button does not operate any parameter and is used to classify expression menus.
You can specify another expression menu file in a Sub Menu button.
In this way, a folder button is available on the platform. By clicking the folder button, you will be redirected to another expression menu.
In addition, we provide a path management mechanism for expression menus so that you do not need to create a button for returning to the previous menu.
Sub Menu has the following rules:
- A maximum of 4 expression menus are supported.
How to use in the platform
After uploading an avatar with an expression configuration file, you can view the button of expressions in the upper right corner of the platform when using this avatar.
Click this button, and then you can open the page for managing expressions.
Each group of the configuration in the expression configuration file is displayed as a button on the page.
You can click a button to execute the function of setting the parameters, and the Animator Controller determines the actual animation effects.
For a Button or Toggle button, the function immediately takes effect after the button is pressed.
After a Radial Puppet button is pressed, a slider will be displayed, with the slider value consistent with the Float value configured.
The value must be configured between 0 and 1.
After a Two Axis Puppet button is pressed, a plane will be displayed.
You can move the point in the center to determine the two Float values.
Each of the values must be configured between -1 and 1.
The vertical axis indicates the X-axis parameter value, while the horizontal axis indicates the Y-axis parameter value.
After a Number Stepper button is pressed, a stepper will be displayed.
When you click a Number Stepper button, the corresponding parameter has been configured to the specified value.
You can adjust the parameter value (between the minimum value and maximum value) by using the stepper.
Updated about 1 year ago