
Para Avatar Root
Para Avatar Root is the only component that specifies your Avatar in the SDK. Any Avatars must be configured and uploaded according to this component.
This component consists of the following configurations:
- Point-of-View Position
- Hand Features
- Lipsync
- Eye Blink
- Animator Controller Group
- Expressions Menu
- ID
When you add this component, the SDK will automatically add another component Capsule Collider as a collision detection object.
The details of collision detection objects are also described in this chapter.
Addition Rules
- The current SDK only supports models that contain human bones. Make sure that your model file contains human bones and is configured with the Animator component.
- This component cannot be mounted to a given sub-node. Make sure that the Avatar in your scene is an independent object on the root node.
- This component cannot be added to the same node for multiple times.
Point-of-View Position

This feature module is used to configure the position of the eyes of your Avatar.
When you are using the Avatar on the platform, the first-person or third-person perspective is computed from the configured position.
Generally, the point-of-view position is situated between your Avatar's eyes and on the same line as them.
Configuration Method
The point-of-view position is computed based on the position of the Avatar.
- When you add the Avatar Root component, the point-of-view position is automatically computed.
- If you want to change the point-of-view position, click the "Show" button to directly select a point-of-view node as the new position in the scene.
- You can also directly enter parameters to accurately adjust the point-of-view position.
Hand Features
This feature module is used to configure the hand features of your Avatar.
It is composed of the following 2 features:
- Pickup Position
- Wave Position
Pickup Position
When your Avatar picks up an object, the position of the object in the hand is controlled by this feature.
When the Para Avatar Root component is added to your Avatar, the pickup position is automatically computed and generated.
Note that the pickup position must correspond to the generated object and cannot be changed.
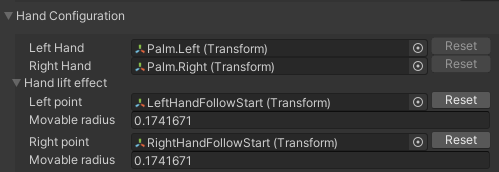
- The left-hand pickup position is named Palm.Left.
- The right-hand pickup position is named Palm.Right.
By default, the objects that you pick up are at the center of your left and right hands, the lower part of your left and right wrist bones.
You can click "Transform" in the component to quickly locate the objects and change their positions to adapt to your Avatar.
If you want to reset their positions, click "Reset".
Wave Position
The wave position is configured to specify the central point and radius when your Avatar is using the wave feature on the platform.
When the Para Avatar Root component is added to your Avatar, the wave position and radius are automatically computed.
Note that the wave position must correspond to the generated object and cannot be changed.
- The left-hand wave position is named LeftHandFollowStart.
- The right-hand wave position is named RightHandFollowStart.
By default, the hands are right in front of the chest of your Avatar.
You can click "Transform" in the component to quickly locate the objects and change their positions to adapt to your Avatar.
The property movable radius is used to configure the radius measured in meters.
If you want to reset the position and radius, click "Reset".
Audio Driven Lipsync
When you speak, it can make your Avatar's mouth (or whatever) automatically respond.
We use MPEG4 standards to correspond to the phoneme and its corresponding mouth shape. You can refer to the Oculus article for visual representations corresponding to 15 different mouth shapes.
To use audio driven lipsync, you need to select a skinning mesh with lipsync shape keys. When a skinning mesh with lipsync shape keys is selected, the system will infer the shape key used by the corresponding phoneme according to the shape key name.

If the result of automatic inference does not meet your expectation, you can configure a shape key for each phoneme one by one.

Performance Reminder
If you are an Avatar creator, consider dividing your Avatar into 2 skinning meshes—one for your body and one for your head/face.
The performance cost of blend shapes depends on how much they affect the 3D model. Keeping the blend shapes on a separate head mesh and using fewer blend shapes on the body mesh may improve your Avatar performance.
Eye Blink
You can use shape keys to simulate eye blinking to make the Avatar look more vivid.
To simulate blinking, you need to enable the blink simulation feature of the Avatar.

After it is enabled, select a skinning mesh with blink animation, and then select the blink shape key in the skinning mesh.
At the same time, you can configure the time interval (in seconds) between each blink simulation. You can also configure whether the Avatar blinks twice in a row each time the blink animation is triggered. This is done by configuring the probability of blinking twice (from 0% to 100%).

Animator Controller Group
This feature assumes that you understand the Animator Controller of Unity.The Animator Controller Group is the core property of an Avatar. All the actions of an Avatar are controlled by the properties of Animator Controllers.
We do not recommend you customize an Animator Controller without understanding it.You can read the Unity's documentation on Animator Controllers. Animation Overview
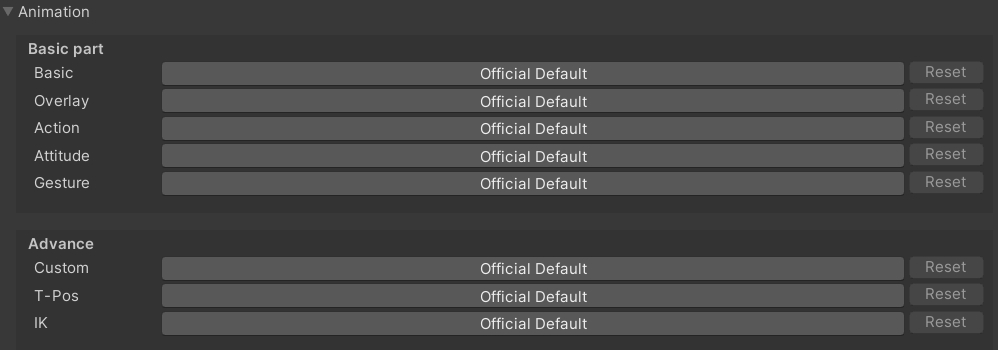
This feature module is used to configure the animation effects triggered when your Avatar performs any actions on the platform.
An Avatar comprises 8 layers of Animator Controllers, each of which specifies the effects triggered when the Avatar performs certain actions.
- Base Layer, which specifies the animation effect triggered when your Avatar moves.
- Additive Layer, which specifies the additional animations to be played when your Avatar performs any other actions.
- Action Layer, which specifies the human bone animations played by your Avatar.
- Posture Layer, which specifies the animation effects triggered when your Avatar performs some special actions, such as sitting down.
- Gesture Layer, which specifies the animation effects triggered when your Avatar performs hand actions, such as picking up an object.
- FX Layer, which allows you to customize any non-human-bone animations.
- T-Pose Layer, which is a special Animator Controller used to set the T-Pose of your Avatar.
- IK Layer, which is a special Animator Controller used to set the IK property of your Avatar.
The SDK offers an entire suite of default Animator Controllers, which are indicated by the Official Default button.
The animation effects of your Avatar can be played normally even without any changes to the default settings.
To customize Animator Controllers, you need to understand all of their features and effects. For details, see the Avatar Animation and Expression System chapter.
Expressions Menu

We allow you to design and create your own Avatar effects using the Animator Controller Group.
A control menu is designed for you to set the parameters of the Animator Controllers on the platform to play your own effects.
The SDK offers default Expressions, which are indicated by the Official Default button.
The animation effects of your Avatar can be played normally even without any changes to the default settings.
Note that Expressions can be empty. If you click the Official Default button to set Expressions to custom mode, but leave them empty, it indicates that your Avatar has no Expressions.
Default Expressions depend on the default Animator Controllers to take effect.Default Expressions depend on the action layer in the default Animator Controllers to take effect. If you change any default Animator Controllers, Expressions may be ineffective or an error may appear.
To edit Expressions, you need to understand the features and effects of Animator Controllers. For details, refer to the Animator Controller Group chapter.
ID
In Para Space, a unique ID is assigned to each World and Avatar. It serves as the important authentication credentials of your assets.
With an asset ID, we can accurately locate your asset, and make relevant features effective.
- Each asset ID is unique and not duplicate.
- Asset IDs can be used to implement certain platform features, such as Avatar Workbench and Portal.

IDs are important privacy data.Note that once your asset ID is disclosed, your asset may be used by others without your permission.
On the SDK and relevant pages, your ID number is hidden by default. Keep your asset ID safe.
If you add the Avatar Root component to an Avatar, the ID mode is "New Avatar".
When you upload an Avatar, the server generates a unique ID for you. The ID points to the file that you have uploaded.
And the ID mode is automatically switched to "Existed Avatar".

It indicates that the Avatar has been uploaded before. If you upload it again, the asset data concerned in the current server will be overwritten. In this way, you can update the asset that you have already uploaded.
- An asset can only be updated and overwritten by the one who uploaded it before. You can rest assured that your assets will not be overwritten by others.
A new editing window appears in the Existed Avatar mode.
Content ID indicates your current ID number.
If you click "Editor Content ID", the original Content ID will be replaced by a text box, where you can edit the ID number. In this way, you can overwrite other asset files under your account.
Collider
When you add the Avatar Root component to your Avatar, the SDK will automatically add the Capsule Collider component.

The capsule is used to determine the physical collision effects of your Avatar and to detect the trigger of certain features.
- Other users can click this capsule to interact with you.
- The map feature can be triggered by this capsule.
By default, the capsule size is automatically configured and cannot be changed. It automatically matches the height of your Avatar.
Add extra capsules
If your Avatar has extra parts, and you want them to physically collide with objects, you can add extra colliders by yourself.
The following 3 collider components can be used as custom capsules:
- Capsule Collider
- Box Collider
- Sphere Collider
When users interact with custom capsules, features will also be triggered.
Updated about 1 year ago